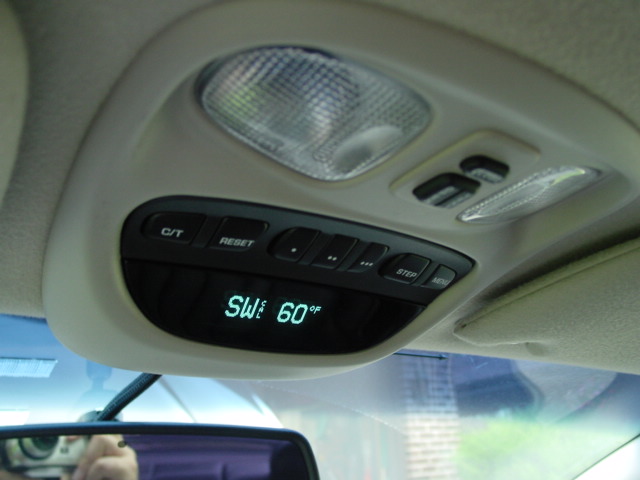
Installing an OTIS / EVIC into a KJ
by Anthony (LibertyKJ)

If you have a KJ Sport or any model that did not come with an Overhead console, there is a good chance it's possible to install one very cheaply!
The only KJ's that you can add an OTIS/EVIC to must have the Premium BCM installed on it.
You have a Premium BCM if you have any one or more of the following options:
Keyless Entry
Steering wheel mounted radio controls
Fog Lights
If you do not have any of the above options, there is a good chance the you have the "Base BCM" and you cannot add an overhead console. However, you can check with your dealer to scan your BCM to see which one it is. (You may even be able to replace your base BCM with a premium BCM to your KJ, though I do not know.)
Once you have figured out if you can add an OTIS/EVIC to your KJ, you need to get one!
Here is list of vehicles you can get an OTIS/EVIC from (if you plan on getting one from a wrecked or junkyard vehicle)
2002 - up Jeep Liberty
1999 - up Jeep Grand Cherokee
1998 - up Dodge Intrepid
1999- up Chrysler 300M
1999 - up Chrysler LHS
1998 - up Chrysler Concorde
The consoles can be bought VERY cheaply from a junkyard or over EBay.
Note: ALWAYS make sure you get the harness connector that plugs into the EVIC/OTIS module (and a few inches of wire) if you buy a used console...you CANNOT install the console without this plug.

If you decide you just have to get a new console, below are the part numbers for the consoles from the Grand Cherokee line. (thanks to wjjeeps.com for this information)
You also need to pick up an Ambient Temperature Sensor for a Jeep Liberty. The sensor is about $30 and installs in only a few minutes. You need this sensor so the display for "Outside Temperature" will work on your console.
Installation
Preparation
The first thing you need to do is remove the overhead dome light (which would look great over the rear seats, wouldn't it?)
To remove the light simply grasp both sides of the bezel and pull down. It is only clipped in so it will just pop out.
Unclip the light connector. You will be plugging this connector into the dome lights that are part of the overhead console later on.
After you have removed and unplugged the dome light, you need to enlarge the hole in the headliner so the overhead console will fit. This is probably the scariest part of the install because not many people are that comfortable cutting up their interior....have no fear, that nasty looking hole you will make will be covered by the console.
I've found the best way to estimate where to cut the headliner is to place the EVIC/OTIS console against the headliner and trace around it with a pencil. Cut in about an inch from where you traced and you should be fine.
Just so you can see that even the most horrible cutting job is fine...take a look at this hack job: :-)

If you received the connector that plugs into the OTIS/EVIC module with a few inches of wire, you'll want to get some wire and lengthen each wire so you'll have enough wire to run down the A-Pillar, down past the fusebox and end up underneath the dash. You'll want to wrap the entire harness you create in electrical tape so the wires don't rattle around inside the A-Pillar or under your dash (plus it makes the install easier and cleaner)
Mounting the Console.
Believe it not, this will only take you about a minute to do.
First plug the light connector that you had plugged into the dome light into the light plug in the console.
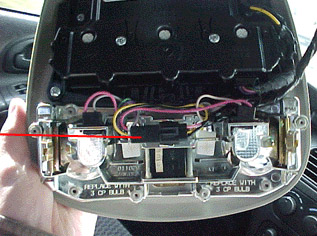
The console uses the same 2 clips on the roof that the dome light used. Simply push the 2 clips on the console into the 2 holes in the roof and it should stay up by itself. There is also a screw towards the front of the console that matches up to a hole in the roof. If the screw wasn't supplied, get a 1 inch or inch and a half sheet metal screw, it should work fine.
Wiring
Run the harness you created under the headliner towards the driver's side A-Pillar.
Remove the two Torx screws holding the A-Pillar to the body.
Underneath the A-Pillar there is plenty of room to run the harness down towards the fusebox.
Run the harness underneath the dash.
There are many places in your KJ where you can splice these wires into. I chose to use the wires behind the Data Link connector (under the right side of your dash) because it is easy to get to and troubleshooting is made simple.
The wiring diagram for the four wires coming from the OTIS/EVIC are as follows:

For every wire except the blue/white wire, you can find a corresponding wire to splice into on the datalink connector.
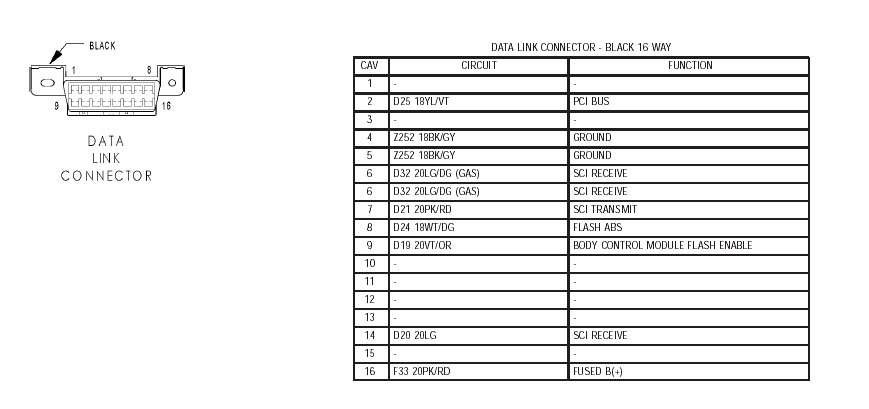
Here is the wiring diagram for the datalink connector, you will want to unscrew the 2 Phillips screws holding the connector to the dash and splice into the wires in back of it. (A soldering iron would be the best to use to connect the wires)
As you can see, you'll be splicing into wires #2 (PCI Bus), #4 (Ground) and #16 (Fused B+).
For the remaining wire (Blue/White), simply find a wire that is only receiving power (is "hot") when the ignition is turned to "on". Use a test light to find a wire and splice the blue/white wire into it.
Temperature Sensor Installation
Before you are done, you must install the temperature sensor or you will not have the outside temperature reading. (If you don't install the sensor, you will get a reading of "OC" (Open Circuit) or some wild reading of negative 47 or something out of the ordinary.
First, remove the plastic front grill from the vehicle. There are 4 Torx screws holding it on.
Once the grill is removed, reach up under the metal cross-radiator support...there will be a wire harness running behind it. A few inches towards the driver's side of the center of this support, there will be the connector for the temperature sensor you purchased. undo the tape holding it in place and plug the sensor in.
You will need to mount the sensor. There is a mount made for the sensor that is already there, you will have to supply a screw to mount it though. (see picture for existing mount for sensor)
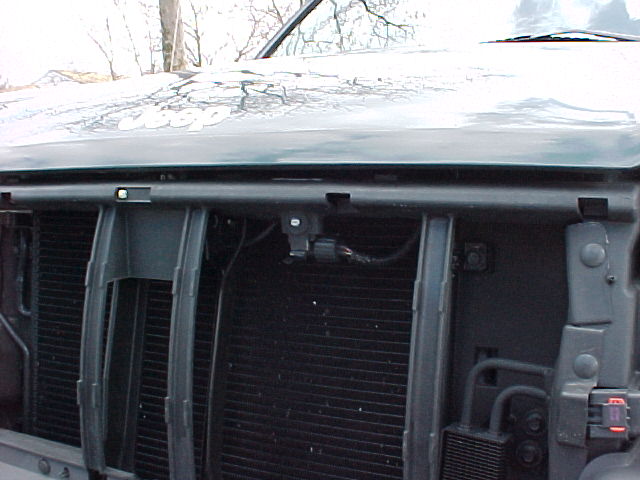

Once you've got the sensor mounted, you can re-install the grill.
Troubleshooting
At this point, you should be complete.
Turn your vehicle on. You should see a compass and temperature display.
If nothing lights up, you have a power problem. Recheck your power connections and your ground.
If you see the compass display, but there are only dashes "---" where the temperature should be, you have one of two problems:
You did not install the Ambient Temperature Sensor, or you didn't install in the plug all the way. Check your connection of the sensor.
You have a short somewhere in the PCI Bus connection (the violet/yellow) wire. Check your connection.
You will need to program your compass to the correct geographical variance. Consult your owner's manual for your variance number. After you have input the correct variance, drive around the block a few times so the compass can calibrate.
Misc.
There are a few different types of EVICs and OTISs...the following will help you know the difference (thanks to Rich, who wrote this):
Difference between OTIS /
EVIC /
EVIC+PSI
There
are three different consoles that are available for the DC vehicles. All
consoles can either come with sunroof controls, or they come without the
controls. If you have a sunroof, make sure you get a console that comes with
controls.
DISCLAIMER: I only deal with consoles as a hobby. If you want a
definite answer on any of this... please consult your dealer.
OTIS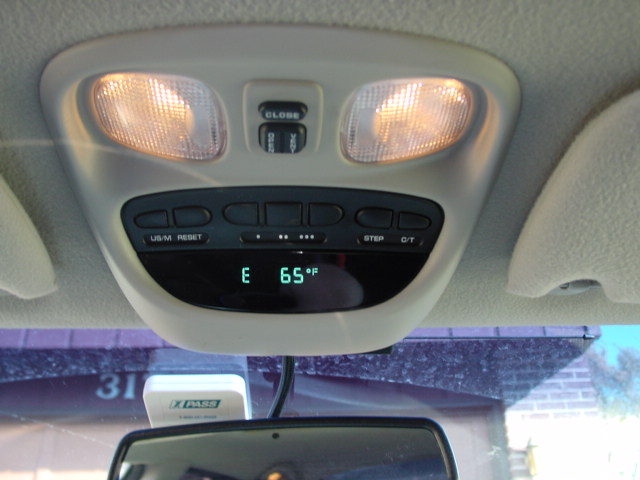
This is the base console. These are
very easy to tell apart from the two different EVICs. The first thing you notice
right away is the LED looking display. This console also has a US/M button. Only
OTIS consoles have this button. Also the lettering for the buttons are located
RIGHT BELOW the buttons themselves.
Now... the features of the OTIS are
as follows....
- Compass
- Temperature
- Trip Mileage (separate from
your speedo trip mileage)
- Average Miles To Gallon
- Instant Miles To
Gallon
- Distance to Empty
- Time Elapsed
- Homelink
- US &
Metric Conversions
The OTIS come from any of the following vehicles:
-
Dodge Intrepid (98 to present - SE / ES / RT/ SXT)
- Chrysler 300m (99 to
present)
- Chrysler LHS (99 to present)
- Chrysler Concorde (98 to
present)
There are some exceptions to this:
If you have a 2001 or
higher vehicle and you try to use an OTIS from a 2000 or earlier donor car...
the Trip Mileage on the console will not work. This is because the BCMs are
incompatible. All the other features will work. If you have a 98, 99 or 2000
model year car, you do not have to worry about this, any OTIS will work for you
and you will get the trip mileage.
Also, I've seen some OTIS consoles
that did not have Instant MPG on them, although these are extremely rare. If you
ever buy a console from somebody (especially on eBay), please verify with the
seller that all these functions do work. Also its best to find out what year the
OTIS came from, as well as what
vehicle..
EVIC
The EVIC is the upgraded
overhead console that came from either 300M, LHS and Grand Cherokee vehicles
that came with a luxury package. The EVIC is really easy to spot. Notice the
much larger, clearer, PIXELATED display. This display looks 10x better than the
OTIS, as its much more pleasing to the eye. Also on the EVICs, you will notice
the lettering for the button descriptions are actually on the buttons themselves
instead of right below. Also, the US/M button was replaced with a MENU button.
The EVIC has basic features, and it also has MENU programming
features.
Now... the basic features of the EVIC are as follows....
-
Compass
- Temperature
- Trip Mileage (separate from your speedo trip
mileage)
- Average Miles To Gallon
- Instant Miles To Gallon
- Distance
To Empty
- Time Elapsed
- Homelink
- US & Metric
Conversions
Also... the EVIC lets you program many different features on
your car. The features it can program will depend on the particular car you own.
Some examples of the features that can possibly be programmed are as
follows: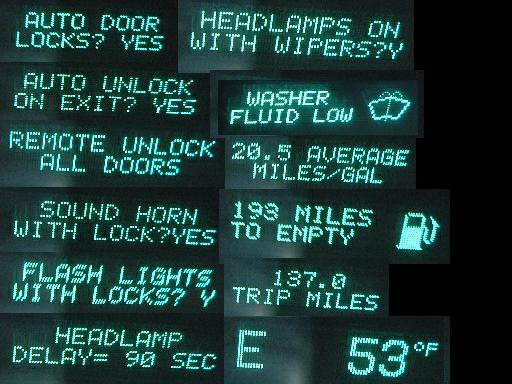
Some other prompts that the menu
can display (depending on your vehicle) are:
- Low Fuel Chime
- Side
Mirrors Tilt in Reverse
- Sentry Key Programming
- Easy Exit
Seats
You will also notice in that above picture that some of the basic
features like Distance to Empty in the OTIS... the OTIS would just light up a
small DTE. On the EVIC... the pixilated display can spell it out "MILES TO
EMPTY"... which looks a lot better.
The EVIC will definitely work on the
following vehicles:
- Dodge Intrepid (All ES & RT & SXT models as
well as 2001 and higher SE models)
- Chrysler 300m (2001 and up)
-
Chrysler LHS (1999 and up)
- Chrysler Concorde (2001 and up)
I know
for a fact that this will NOT work on a 300m (99-00) and an Intrepid SE (98-00).
Its also possible it may not work on a Concorde (98-00).
EVIC+PSI
The EVIC+PSI console does
everything the EVIC does... and works on all the same vehicles the EVIC does.
The only difference is on most EVIC+PSIs... the InstantMPG function was replaced
with a TIREPSI feature. There are some rare EVIC+PSI units that have both the
PSI and Instant MPG functions, but those are few and far between. Instant MPG
was discontinued by Chrysler during the 2002 model year as a cost-cutting
technique.
The Tire PSI feature will give you real-time PSI reading on
all four of your installed tires. This is a really cool feature, especially as
the PSI reading usually goes up as you drive the car. The reason for this is, as
you drive the tires get warmer... which brings the PSI higher.
The EVIC
PSI gets tire PSI readings by communicating wirelessly with PSI sensors you
install on all five of your tires (including your spare). The sensors can be
bought at the dealer, and are not cheap. They retail for $40-50 bucks EACH.
There are some sellers on eBay that will include the sensors with an EVIC+PSI
console.
The PSI sensors look like
this: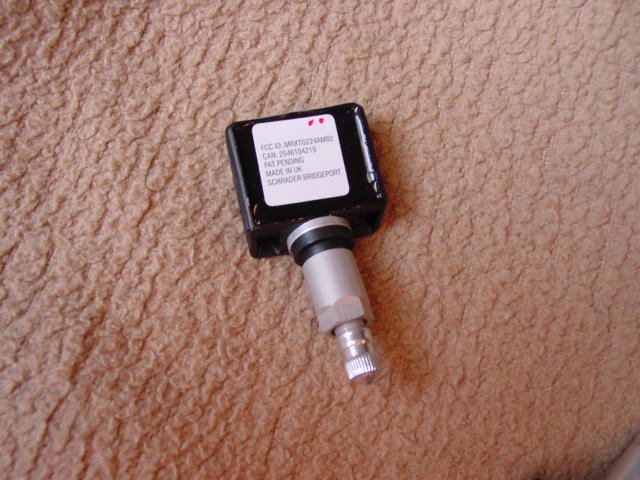
You train the PSI sensors using the
MENU function on the EVIC that brings up this prompt: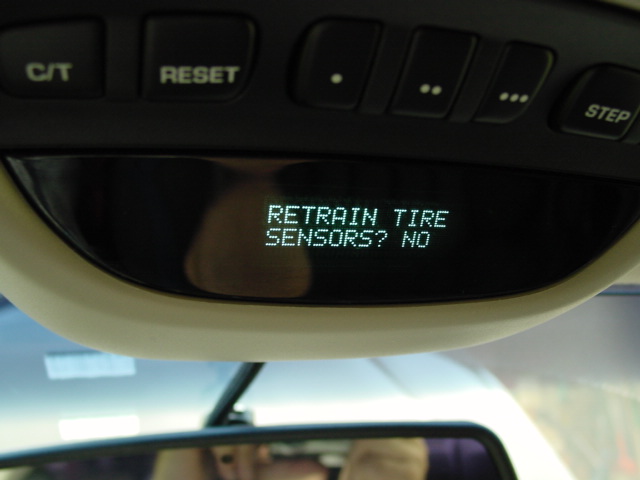
You follow the instructions of the
EVIC after selecting yes to this prompt by using a special training magnet and
placing the magnet on each tire the EVIC specifies. Its actually quite
easy.
Thats pretty much it. If you are installing an overhead console
from scratch, make sure you get the wiring harness connectors for both the
console itself, and the fuse panel. If you do not have these parts, the
installation will be extremely difficult.